三次握手–连接
在通信的过程中,Client与Server建立TCP连接需要三次握手,为什么需要三次握手呢?又是怎么握手的过程?
TCP连接是可靠的通信方式,必须要保证两端都同时有效,且线路通畅。
如同两个人通话,但并不确定对方能不能听到,经历几次才能确保通信方式可靠呢?
在通信的过程中,Client与Server建立TCP连接需要三次握手,为什么需要三次握手呢?又是怎么握手的过程?
TCP连接是可靠的通信方式,必须要保证两端都同时有效,且线路通畅。
如同两个人通话,但并不确定对方能不能听到,经历几次才能确保通信方式可靠呢?
在不借助DB引擎情况下,想完成数据的持久化存储,最简单的方法写一个文件存在本地,读取的时候加载文件到内存,然后进行筛选。 存储一个user在本地。
1 | id|userName|userCode|sex|phoneNumber |
上面满足了我们的需求,看到这种数据格式,查询的时间复杂度为O(n).
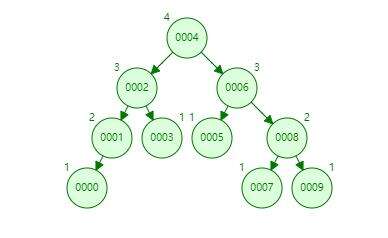
B树和B+树是很多数据库索引采用的数据结构,为什么会使用B树,而不采用更常见的二叉树的呢?
举个例子,有这么几个数字:1,2,3,4,5,6,7,8,9,0,分别生成AVL树,B树

Java是以安全著称,但在Java中有一个类是一个Bug级别的存在,那就是Unsafe. 前面已经说过Unsafe在java中的使用,此处我们直接说用法:
当你想跳过对象初始化的阶段,或者绕过构造函数的检查,去实例化没有任何公共构造函数的类,可以使用allocateInstance:
1 | class A { |
使用构造函数、反射和unsafe初始化它,将得到不同的结果。
1 | public static void main(String[] args) throws IllegalAccessException, InstantiationException { |
我们可以使用Unsafe去做一些绕过安全的技术:
1 | class Guard { |
当客户端调用giveAccess代码是,始终返回的都是false.使用Unsafe可以绕过权限:
1 | Guard guard=new Guard(); |
sizeOf是返回对象的自身内存大小。
1 | public static long sizeOf(Object o) { |
如果只是对象类的结构大小,那么可以更简单的实现:
1 | public static long sizeOf(Object object){ |
为了计算自身内存的大小,可以简单的添加拷贝的对象方法,标准的解决方案是使用Cloneable修改代码,或者实现自定义的拷贝方法.
浅拷贝:
1 | public class ShallowCopy { |
在Unsafe类中可以删除内存中的对象,比如密码信息。用户的密码大多数都是byte[]或char[]数组,为什么要使用数组呢?
这个是出于安全的考虑,因为我们可以删除不需要的数组元素,如果是一个字符串对象的话,这可以像一个对象在内存中保存,删除该对象只是删除了引用,真正的数据还保存在内存中。
1 |
|
为了能够更好实现AOP的思想,在Java中有了动态代理概念,与动态代理相对应的就是静态代理,首先看下面的代码。
1 | public interface IWoker { |
如果我们想在sayHello的方法前后分别都打印一条日志,实现AOP的思想,那使用静态代理的方法如下:
1 | public class WorkerProxy { |
定义一个WorkProxy的代理类,在执行方法的时候,使用代理类来执行:
1 | Worker worker = new Worker(); |
静态代理很好立即,即是使用组合类的方式来实现代理模式。这种形式的就是过于单一,代理的接口多的时候,就对应会产生很多代理类。
而java的动态代理就是为了解决这个问题,动态代理实现的代码如下:
1 | //动态代理类 |
代码调用:
1 |
|
从上面的代码可以看出,动态代理返回来的proxy对象很奇怪,通过调试可以看到对应的类型为:

对于Proxy对象可以通过java语法分析如下:
Proxy对象的类一定是实现了IWorker接口DynaminProxy中invoke方法来调用真正的方法根据上面的推断,proxy的对象的代码应该是:
1 | public class $Proxy implements IWoker { |
使用代码进行的调用的时候,运行结果一致。在刚刚的代码中,如何实现的这个功能的呢?
1 | Proxy.newProxyInstance(IWoker.class.getClassLoader(), new Class[]{IWoker.class}, new DynaminProxy(worker)); |
再观察动态代理的创建方式,有三个参数ClassLoader,Class的数组和最终的是执行的代码。
根据上面的代码,可以先确定代码实现的思路:
$Proxy.java $Proxy.class ClassLoader加载对应的类,创建对象返回。根据上面的思路,可以编写代码如下:
创建$Proxy.java类,实现动态生成类
1 | StringBuilder classContent = new StringBuilder(); |
生成的类结果
1 | package com.rz.frame.dynamicproxy; |
把类写入文件,调用编译器编译成.class文件
1 |
|
使用classloader加载class
1 |
|
在分布式环境中,为了保证业务数据的正常访问,防止出现重复请求的问题,会使用分布式锁来阻拦后续请求。具体伪代码如下:
1 | public void doSomething(String userId){ |
上面的代码很简单,查询db中有没有对应的user数据,如果有的话,执行更新操作,如果没有则插入。
我们知道,上面的代码是线程不安全的,在多线程的环境中,就会出现问题。为了能够保证数据的正确性,在单机环境下,我们可以使用synchronized的方法,来保证线程安全,具体修改:
1 | public synchronized void doSomething(String userId){ |
在单机器的环境下,能够解决线程安全的问题,那在分布式环境下呢? 这个时候需要用到分布式锁.
分布式锁需要借助其他组件来实现,常用的有redis和zookeeper。下面我们就用redis的实现,来说明下问题,分布式锁具体的实现方法如下:
1 | public void doSomething(String userId){ |
上面的代码解决了在分布式环境中的并发的问题。但同样需要考虑一个问题,如果insert操作和update操作异常了,分布式锁不会释放,后续的请求还会被拦截。
所以我们再优化,增加对异常的捕获。
1 | public void doSomething(String userId){ |
现在即使是程序异常了,锁会自动释放。但redis的get和set也会存在并发问题,我们再继续优化,使用redis中的setnx方法。
1 | public void doSomething(String userId){ |
上面的代码好像没有什么问题了,但也存在很大的隐患。
我们分析下,假设第一个请求过来,执行锁定成功,程序开始运行,但是insert和update操作阻塞了1s,第二个请求过来,锁的缓存已经过期,第二个执行锁定成功,这个时候第一个请求完成了锁被释放,第二个请求的锁就被第一次请求释放了,第三次的请求就会造成线程不安全问题。
怎么再去优化呢?问题主要是出现在第一次请求误删锁的问题,所以我们在移除锁的时候要判断能否移除。
思路:我们在锁定的时候,value使用当前的时间戳,删除时判断是否过期如果不过期就不要删除,具体代码如下:
1 | public void doSomething(String userId){ |
这样即使出现阻塞,第二次的时间戳覆盖了第一次的锁定,这样即使第一次完成了,也不会释放锁。
在Java访问mysql的时候,需要用到jdbc驱动,传统连接方式为:
1 | try { |
我们对上面的代码做一个简单的性能测试,代码如下:
1 | public static void main(String[] args) { |
上面代码用了100个线程分批次去完成查询的动作,在我的机器上运行时间45s左右。
从上面的代码可以看出问题,Connection对象每一次都是重新创建,查询完成后,直接是调用close方法,如果不释放,会报连接数过多的异常。 如果查询多次,那浪费在创建Connection的时间就会很多,我们知道在程序优化的手段中,有一个池化可以很好的解决这个问题。
池化的概念就是先创建多个对方存在在一个容器中,当时候的时候可以直接拿出来时候,用完后再进行归还。 跟着这个思想,我们来创建自己的连接池。
创建一个线程安全的容器(由于是多线程访问),队列或者是list,因为Connection的对象并不是有序的,所以可以使用list容器
对Connection的对象进行封装,增加一个isBusy变量,每次读取的时候就可以选出空闲的Connection对象
如果取的时候,没有可用的Connection对象,则可以再自动创建对象,可以自动扩容,直到扩容到允许的最大值。
封装的Connection类:
1 | public class PooledConnection { |
包装好Connection后,可以考虑如何对Connection进行创建和分配,需要有以下几个方法:
1 | PooledConnection getPooledConnection(); |
为了更好的程序调试,先定义几个初始的参数变量:
1
2
3
4
5
6
7
8
9
10
11
12//数据库相关参数
private static String jdbcDriver = null;
private static String jdbcUrl = null;
private static String userName = null;
private static String password = null;
//容器参数
private static int initCount;//初始数量
private static int stepSize;//每次扩容的数量
private static int poolMaxSize;//最大数量
//全局锁
private static Lock lock;
为了保证线程安全,使用线程安全的Vector集合。
获得对象的方法,应该是先找到一个空闲的PooledConnection变量,如果有就直接返回。
如果没有空闲的变量,则尝试进行扩充,扩充由一个线程完成,其他线程则等待,或者尝试再次获取。
1 | public PooledConnection getPooledConnection() throws RuntimeException, SQLException { |
扩容的方法相对比较简单,判断当前对象数量有没有溢出,如果没有溢出,就进行扩容
1 | public void createConnections(int count) throws OutofMaxCountException, IllegalArgumentException { |
上面的代码隐藏一个问题,我们增加对数据的查询方法,方便我们测试。 查询方法如下:
1 | public ResultSet querySql(String sql) { |
我们对代码做性能测试同样的测试,在我的电脑运行时间为5s左右,大概快了10倍。 但经过多次测试,代码抛出了ConcurrentModificationException异常,这个异常的原因是因为在使用的时候,我们又修改了正在使用的对象。所以在使用的时候要对对象进行加一个读写锁。
为了锁不至于影响到锁的性能,我们把锁碎片化,采用针对每一个对象进行加锁,而不是全局加锁。修改后的封装对象:
1 | public class PooledConnection { |
最终结果:
1 | public PooledConnection getPooledConnection() throws RuntimeException, SQLException { |
首先是无法控制连接最大的数量 ,问题出在扩容没有控制一个线程扩容,使用tryLock解决,代码如下:
1 | while (realConnection == null) { |
ConcurrentModificationException异常,在读取的使用的时候,对象有写入操作,需要保证读取可以并发,读写不能一起,写不同对象是可以并发,使用读写锁可以解决:
1 | reentrantReadWriteLock.writeLock().lock();//读写互斥,写写互斥 |
1 | reentrantReadWriteLock.readLock().lock(); |
使用上面的代码会存在一个性能问题,就是在写入的时候,如果写入的是不同对象,写入也会进行排斥,所以应该对单个PooledConnection使用锁。
把锁进行碎片化优化
1 | public class PooledConnection { |
读的时候加入读锁:
1 | PooledConnection pooledConnection = getPooledConnection(); |
写入加锁:
1 | pooledConnection.writeLock();//读写互斥,写写互斥 |
优化后耗时:耗时为:3692ms 。
原来一直使用mysql,没有自己真正的搭建,搭建也只是本地的连接,现在手上有两台电脑,想搭建一个主从的架构,在配置mysql的环节费了一点时间,其实都是很小的问题,今天记录下:
mysql 安装和启动
1 | mysql --install |
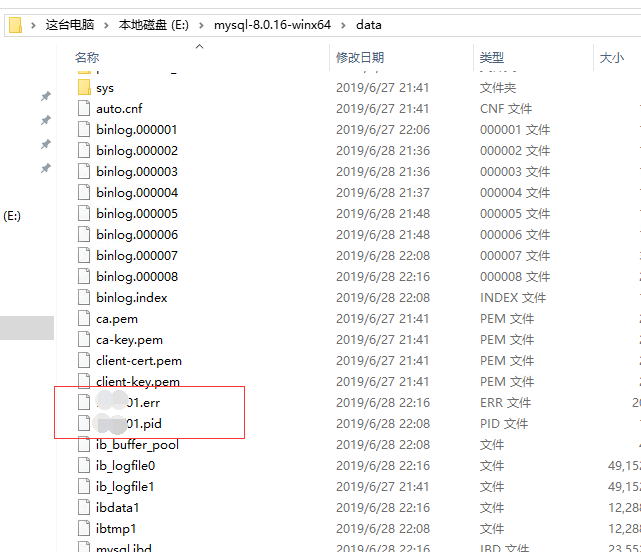
安装完之后,发现忘了记密码,可以到 mysql-8.0.16-winx64\data中找到.err文件,里面有初始密码 ,本地用localhost连上之后可以自己修改密码。

远程连接
mysql 需要远程连接需要权限,错误的信息如下:
1 | 错误号码1130 |
执行下面的代码可以解决:
1 | use mysql; |
如果碰到无法更新,因为mysql 更新使用安全模式,需要关闭.
报错信息如下:
1 | Error Code: 1175. You are using safe update mode and you tried to update a table without a WHERE that uses a KEY column. To disable safe mode, toggle the option in Preferences -> SQL Editor and reconnect. |
执行以下sql:
1 | SET SQL_SAFE_UPDATES = 0; |
连接远程的mysql时报错,原因时mysql8.0的加密方法变了。
1 | 错误号码2058 |
1 | ALTER USER 'root'@'localhost' IDENTIFIED BY 'password' PASSWORD EXPIRE NEVER; #修改加密规则 |
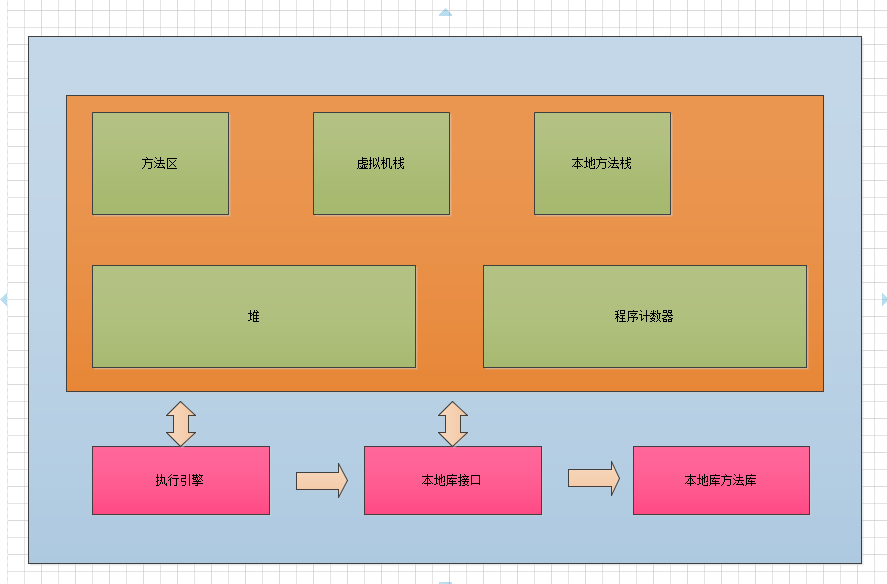
Java把内存大概分为:方法区,虚拟机栈,本地方法栈,堆和程序计数器5个区。
程序计数器 是一块比较小的内存空间,可以看成是一个线程的运行的指示器,是一个线程私有的内存。由于JVM的运行时通过线程抢占CPU的时间片实现的(在任何一个时刻,一个CPU只能执行一个指令),如果存在线程的上下文切换,每个线程在被移除时间片的时候都需要记录执行的位置。如果当前正在执行的是Native方法,则不需要计数器来标记。
虚拟机栈也是线程私有的内存,Java代码在运行的时候,会对每一个方法创建一个栈帧,用于存储局部变量,操作数据,动态链接等数据。
本地方法栈 和虚拟机栈作用类似,本地方法栈是为了Java调用Native方法服务。
Java堆 是Java常用的引用对象的真实存储的区域,也是修改和访问最为频繁的区域。
Java的内存模型分类大致如下:
标记清除算法是最基础的算法,算法分为“标记”和“清除”两个阶段: 先标记出需要回收的对象,然后再统一回收所有标记的对象。
标记清除算法的缺点主要有两个:一个效率比较慢,一个是会产生内存碎片。碎片太多会导致在分配较大对象的时候,无法找到连续的空间,而不得不提前触发一次垃圾回收。
为了解决标记清除法的效率问题,出现了复制算法。把内存分为大小相同的两个部分。使用的时候,只是用其中的一块,每次进行垃圾回收的时候,就把存活的对象复制到另外一块内存,然后把当前的内存区域直接清空。
复制算法比较简单高效,但是带来的后果是内存的浪费,可使用的内存只有原来的半。
结合上面两种算法的有点和缺点,标记整理的算法就能够很好的解决浪费和内存的碎片问题。
标记整理的算法,标记过程与标记清除算法相同,只是在回收的时候,把存活得对象都向一侧移动,然后直接清理掉边界以外的内存。
标记整理虽然解决了内存的碎片化的问题,但还是没有解决性能问题。
分代收集算法是一个综合算法,根据不同对象的生存周期而采用上面三种算法。
Java一般把堆内存分为老年代和新生代,新生代存活率低,只需要少量存活得空间就可以了回收,则可以使用复制算法。
老年代存活率高,没有额外的空间担保,就只能是由标记整理或者标记清除方法。
在Hotspot的虚拟机中,如何实现垃圾内存的标记,首先我们需要理解一个概念:GC Root节点和可达性分析。
GC Root节点包含以下几种类型:
 1. 虚拟机栈(栈帧中的本地变量表)中引用的对象。

 2. 本地方法栈中JNI(即一般说的native方法)引用的对象。

 3. 方法区中的静态变量和常量引用的对象。
在Java中判断一个对象的是否存活,都是通过判断这个对象是否具有可达性,即变量是否被GC Root节点引用。
在HotSpot的虚拟机中,使用一组ooPMap的数据结构来记录对象的引用关系。
Serial收集器
Serial是最基本的,时间最长的垃圾收集器,采用复制算法回收。Serial在JDK1.3以前都已经在使用了,从名字可以看出Serial收集器是单线程工作的。单线程带来的问题是在程序在垃圾回收的时候,会出现停顿。 Serial收集器在有的场景中的有点点也很多,由于没有cpu上下文的切换,是的Serial收集器相对比较简单高效,短暂的暂停只要不是过于频繁,还是能够被接受的。
ParNew收集器
ParNew是Serial收集器的多线程版本,可以通过XX:ParallelGCThread参数来控制会受到的线程数,在单个CPU的环境下,由于存在线程的上下文的切换,所以性能不一定能保证优于Serial收集器。
Parallel Scavenge 收集器
Parallel Scavenge 收集器是新生代的收集器,也是采用复制算法。和其他收集器不同的是,Parallel Scavenge 收集器只关心吞吐量,而不关心GC的暂停时间。
举一个简单的场景,如果一个垃圾回收过程,一次GC需要1s,如果分成4次,每次需要0.5s,两次GC的时间分别是1s和2s,对于程序的体验来后,后者的GC时间的停顿间隔低于前者,大多数GC回收期都会采用后面的回收机制,而对于Parallel Scavenge 收集器会选择前者,而不会选多次回收来降低GC的停顿时间。
Parallel Scavenge 收集器 提供了两个参数来控制吞吐量,XX:MaxGCPausmillis控制停顿时间,-XX:GCTimeRatio设置吞吐量的大小。
Serial Old 收集器
Serial Old 收集器是Serial收集器的老年代的版本,同样是一个单线程版本,采用标记整理算法。
Parallel Old收集器
Parallel Old收集器是 Parallel Scavenge 收集器的一个老年代版本,采用标记整理算法。在JDK1.6版本中才开始提供,在此之前,如果新生代采用了Parallel Scavenge收集器,老年代回收除了Serial收集器之外别无选择。由于Serial收集器的效率拖累,所以Parallel Old收集器应运而生。
CMS收集器
CMS收集器是一种以获取最短回收停顿时间为目标的收集器,大部分运行在BS的服务端。CMS收集器主要有4个步骤:
初始标记是仅仅标记一下GC Roots直接关联到的对象,速度很快。并发标记就是进行GC Roots Tracing的过程,重新标记是为了修正有变动的的对象。在初始标记和重新标记的时候,需要“Stop the world”。
G1 收集器
G1收集器是最新的收集器,也是面向服务端的垃圾收集器,G1具有一下几个特点:
G1 收集器大致分为下面几个步骤:
与CMS对比,最终标记和CMS重新标记相同,不同的在于筛选回收,筛选回收是先对各个回收的Region的回收价值和成本进行综合排序,根据用户的期望来进行回收。
在Java的堆内存中可以简单把内存分为如下结构:
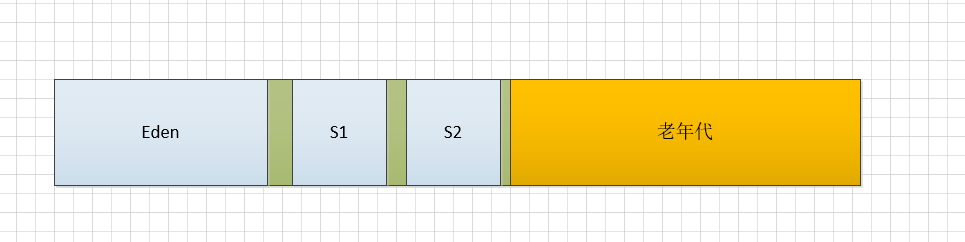
对象优先在Eden分配
在大多数情况下,对象的分配优先在新生代Eden中分配,当Eden没有足够的空间进行分配的时候虚拟机触发一次Minor GC。
大对象直接进入老年代
大对象通常是指很长字符串和数组,新生代的内存无法安置,就直接进入老年代空间尽心存放,大对象内存的阈值可以用-XX:PretenureSizeThreshold参数来定义。
长期存活的对象进入老年代
对象在Eden中出生,并经历了一次MinorGC后仍然存活,并且能够被Survivor存放的话,将会把对象从Eden区域移动到S1区域,年代就记为1岁。当年龄增加到一定(默认是15岁)就会被晋升到老年代,这个阈值可以通过-XX:MaxTenuringThreshold设置。
为了更好的适应不同程序的内存情况,虚拟机并不是简单的要求对象的年龄必须达到某个阈值,如果在Survivor空间中相同年龄所有对象的大小综合大于Survivor空间的一半,则年龄大于或等于这个年龄的对象可以直接进入老年代。
空间分配担保
为了保证Minor GC能够顺利执行,虚拟机会在MinorGC 回收前检查老年代最大可用的连续内存空间是否大于新生代所有对象总和,如果条件成立,该次MinorGC可以安全执行。
如果不成立,虚拟机会查看是否允许担保失败,如果允许,则虚拟机会继续检查可用空间是否大于历次晋升到老年代的平均水平,如果大于,则尝试进行一次MinorGC,显然这次回收是有风险的,如果分配失败则会重新触发一次FULL GC。
如果虚拟机设置不允许担保失败,则会进行一次FULL GC。
最近看到线上的项目线程数过大的报警,开始还是不知道什么原因,因为很多项目都使用同样的线程池管理代码,认为那个项目是偶然的因素造成的,后来经过分析,发现线程数每天都在增加。其他的项目由于发布导致线程会从零开始计算,所以没有那么快达到报警值。 触发报警的代码大概如下:
1 | boolean start=true; |
上面的代码存在两个问题:
start是个主线程的变量,在主线程修改值,子线程的while循环不会停止
上述代码能够停止,因为在内部调用`Thread.sleep方法,导致线程内的变量刷新
newFixedThreadPool 线程池没有调用shutdown方法,导致线程不会被回收。
改正方法:
start 设置成线程共享变量volatile类型
在最后调用停止的时候,让线程池进行回收
修改后代码如下:
1 |
|
线程池在最后不使用后,为什么线程没有被释放?GC为什么没有把线程池对象回收?是怎么做到的?
目前还没有找到问题的答案,等找到后回来更新。
Update your browser to view this website correctly.&npsb;Update my browser now