线程和进程
对于进程和线程的概念可以简单的理解成一个包含关系,例如:一个人个体可以称为社会的一个进程,人可以同时做很多事情,这个称之为线程
CPU一次只能执行一个指令,操作系统为了保证同一时刻多个程序同时执行, 把每次执行的指令过程分成若干时间片(timeslice),每一个程序都会在指定的时间片上运行一段时间后,然后保存运行的上下文资源,来保证下次执行。
由于进程对于资源的需求比较多,保存和恢复都会需要很多时间,CPU每次执行的单位都是线程。
所以单核的CPU的执行其实本质都是单线程.
例如我们同时运行A、B、C三个程序:
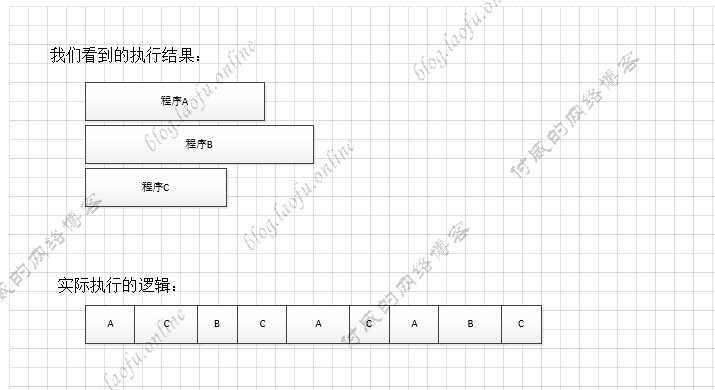
疑问:如果是多线程本质还是单线程执行为什么我们还要使用多线程?
因为在程序执行的过程的中,CPU的执行速度大于内存,也远远大于磁盘IO的运算,如果一个程序CPU执行完成后,要等待磁盘和内存的读取。在等待期间,CPU处于空闲的状态,这样就导致的资源的浪费。
多线程的引入是在CPU存在空闲的时间片的时候,能够有指令被执行,不必再等待其他的执行。
疑问: 如何控制线程的执行先后?
CPU的实行被划分成时间片来执行,所以线程能否被调度,本质是能否抢到时间片。
既然是抢时间片,就存在随机性,所以线程本身的调度时间我们无法完全控制。(可以采用让出时间片来控制,但也不是根本上解决调度顺序)
Java中的线程
Thread使用
在Java中,使用Thread来创建线程,使用start的方法来启动线程(此处并不是真正的启动)。我们可以简单的使用:
1
2
3
4
5
6
7
8
9
10
11
12
13
| public static void main(String[] args) {
Thread th=new Thread(()->{
System.out.println("a");
});
th.start();
try {
Thread.currentThread().join();
} catch (InterruptedException e) {
e.printStackTrace();
}
}
|
Thread中有stop,interrupt,join等方法。其中stop不推荐使用。interrupt表示中断线程执行,join等待当前线程执行完成。
Fork/Join
Fork/Join框架是Java7提供的一个用于并行执行任务的框架,利用递归把总任务分割成若干个小任务,然后把每个任务的执行结果汇总到总任务
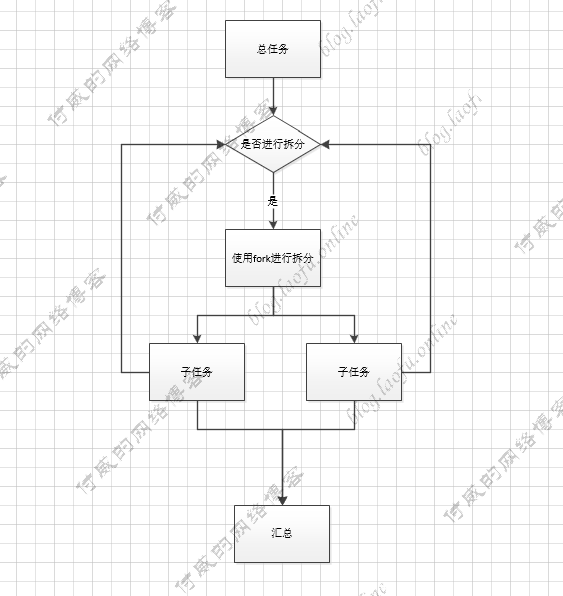
我们使用forkJoin框架计算1000的加和,具体使用代码:
1
2
3
4
5
6
7
8
9
10
11
12
13
14
15
16
17
18
19
20
21
22
23
24
25
26
27
28
29
30
31
32
33
34
35
36
37
38
39
40
41
42
43
| private static final Integer MAX = 200;
static class SumForkJoinTask extends RecursiveTask<Integer> {
private Integer startValue;
private Integer endValue;
public SumForkJoinTask(Integer startValue , Integer endValue) {
this.startValue = startValue;
this.endValue = endValue;
}
@Override
protected Integer compute() {
if(endValue - startValue < MAX) {
System.out.println(String.format("02.执行任务=>start:%s,end:%s",startValue,endValue));
Integer totalValue = 0;
for(int index = this.startValue ; index <= this.endValue ; index++) {
totalValue += index;
}
return totalValue;
}
else {
SumForkJoinTask subTask1 = new SumForkJoinTask(startValue, (startValue + endValue) / 2);
subTask1.fork();
SumForkJoinTask subTask2 = new SumForkJoinTask((startValue + endValue) / 2 + 1 , endValue);
subTask2.fork();
System.out.println(String.format("01.拆分任务=>start:%s,end:%s",startValue,endValue));
return subTask1.join() + subTask2.join();
}
}
}
public static void main(String[] args) {
ForkJoinPool pool = new ForkJoinPool();
ForkJoinTask<Integer> taskFuture = pool.submit(new SumForkJoinTask(1,1001));
try {
Integer result = taskFuture.get();
System.out.println("result = " + result);
} catch (InterruptedException | ExecutionException e) {
e.printStackTrace(System.out);
}
}
|
打印结果:
1
2
3
4
5
6
7
8
9
10
11
12
13
14
15
16
| 01.拆分任务=>start:1,end:1001
01.拆分任务=>start:1,end:251
02.执行任务=>start:1,end:126
02.执行任务=>start:127,end:251
01.拆分任务=>start:252,end:501
02.执行任务=>start:252,end:376
02.执行任务=>start:377,end:501
01.拆分任务=>start:502,end:1001
01.拆分任务=>start:502,end:751
01.拆分任务=>start:1,end:501
01.拆分任务=>start:752,end:1001
02.执行任务=>start:502,end:626
02.执行任务=>start:752,end:876
02.执行任务=>start:627,end:751
02.执行任务=>start:877,end:1001
result = 501501
|
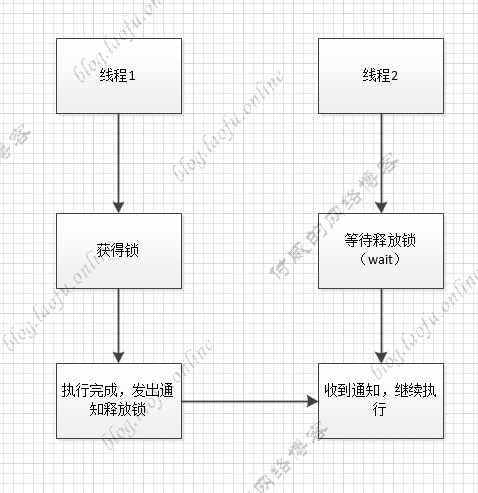
wait和notity
wait和notify是线程的阻塞和通知,可以实现线程间的通信。具体的流程图如下:
具体使用代码如下:
1
2
3
4
5
6
7
8
9
10
11
12
13
14
15
16
17
18
19
20
21
22
23
24
25
26
27
28
29
30
31
32
33
34
35
36
37
38
39
40
| public class LockWait {
static volatile List<String> itemContainer = new ArrayList<>();
static Object obj = new Object();
public static void main(String[] args) {
Thread th1 = new Thread(() -> {
synchronized (obj) {
for (int i = 0; i < 10; i++) {
System.out.println("th1添加元素");
itemContainer.add(String.valueOf(i));
if (itemContainer.size() == 5) {
System.out.println("th1线程发出通知");
obj.notify();
}
}
}
});
Thread th2 = new Thread(() -> {
synchronized (obj) {
System.out.println("进入th2线程");
if (itemContainer.size() != 5) {
try {
System.out.println("th2线程开始等待");
obj.wait();
System.out.println("th2线程等待结束");
} catch (InterruptedException e) {
e.printStackTrace();
}
System.out.println("th2线程结束");
}
}
});
th2.start();
th1.start();
}
}
|
具体可以查看Java多线程通信lock和wait
在wait和notify释放锁的情况,wait 不释放锁,notify释放锁。
线程池
创建和销毁线程需要耗费CPU的资源,为了不必要的浪费,可以把线程进行池化管理,这就是线程池。
在Java中有四个类型的线程池,分别是:
newFixedThreadPool:初始化一个固定线程数的线程池,即使没有任务线程也会驻留在内存中。
newCachedThreadPool: 初始化一个缓存线程池,不控制线程数据量,当没有任务执行的,超时会自动释放。在使用时,要注意线程数量和创建线程的开销。
newSingleThreadExecutor:初始化只有一个线程的线程池, 如果该线程异常结束,会重新创建一个新的线程继续执行任务,唯一的线程可以保证所提交任务的顺序执行。
newScheduledThreadPool: 初始化的线程池可以在指定的时间内周期性的执行所提交的任务。
下面newFixedThreadPool使用的方法,其他的用法类似。
1
2
3
4
| ExecutorService executorService = Executors.newFixedThreadPool(10);
executorService.execute(()->{
});
|
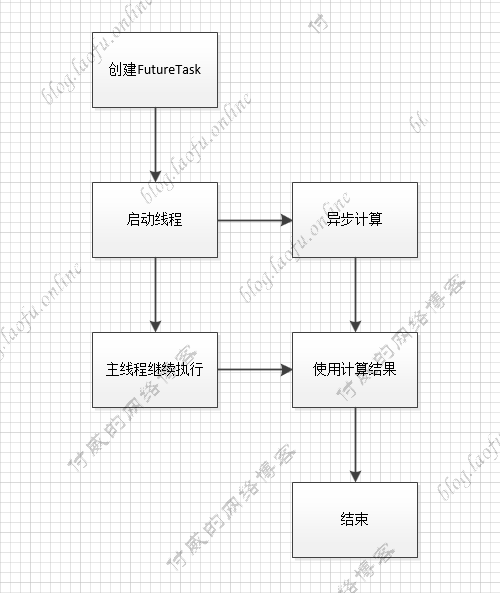
Future和FutureTask的使用
Future是一个interface,FutureTask是其中的一个实现类, 多用于耗时的计算,主线程可以在完成自己的任务后,再去获取结果。
具体使用方法:
1
2
3
4
5
6
7
8
9
10
11
12
13
14
15
16
17
18
19
20
21
22
23
24
25
26
27
28
29
30
31
32
33
| public class FutureTaskObj {
public static void main(String[] args) {
TaskObj task = new TaskObj();
FutureTask<Integer> futureTask = new FutureTask<Integer>(task);
Thread thread = new Thread(futureTask);
thread.start();
System.out.println("创建Task完成");
System.out.println("主线程继续执行");
try {
System.out.println("运行结果" + futureTask.get());
} catch (InterruptedException e) {
e.printStackTrace();
} catch (ExecutionException e) {
e.printStackTrace();
}
System.out.println("所有任务执行完毕");
}
}
class TaskObj implements Callable<Integer> {
@Override
public Integer call() throws Exception {
System.out.println("子线程在进行计算");
Thread.sleep(1000);
int sum = 0;
for (int i = 0; i < 100; i++)
sum += i;
return sum;
}
}
|
Future也可以使用线程池的方法启动,具体代码如下:
1
2
3
4
5
| ExecutorService executor = Executors.newCachedThreadPool();
TaskObj task = new TaskObj();
FutureTask<Integer> futureTask = new FutureTask<Integer>(task);
executor.submit(futureTask);
executor.shutdown();
|
其他几个类的使用
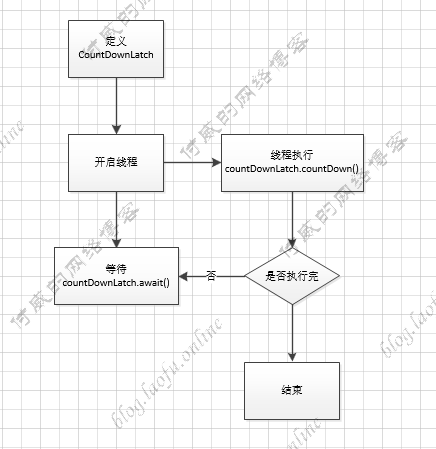
CountDownLatch
CountDownLatch 是等待线程执行完,在进行执行,具体的执行逻辑:
具体的执行代码:
1
2
3
4
5
6
7
8
9
10
11
12
13
14
15
16
17
18
19
20
| public static void main(String[] args) {
try {
CountDownLatch countDownLatch = new CountDownLatch(5);
for (int i = 0; i < 5; i++) {
int finalI = i;
Thread th=new Thread(()->{
System.out.println(String.format("执行第:%s个线程",finalI));
countDownLatch.countDown();
});
th.start();
}
countDownLatch.await();
System.out.println("执行完成");
} catch (InterruptedException e) {
e.printStackTrace();
}
}
|
打印结果:
1
2
3
4
5
6
| 执行第:0个线程
执行第:1个线程
执行第:3个线程
执行第:2个线程
执行第:4个线程
执行完成
|
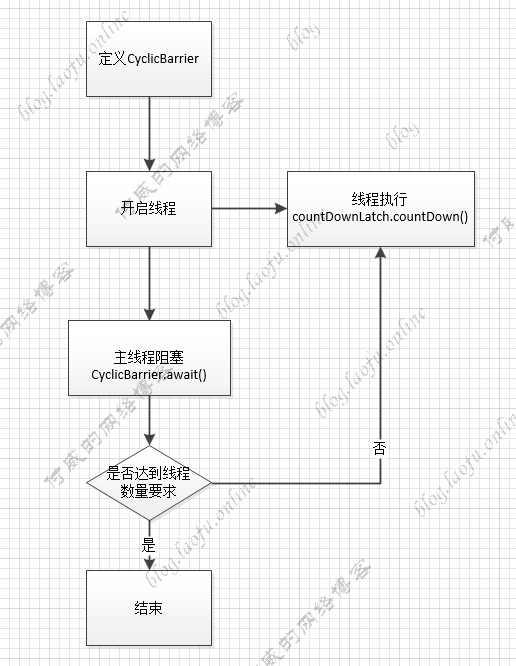
CyclicBarrier
CyclicBarrier 是栅栏的意思,线程数达到某个值时,再继续执行。
具体代码:
1
2
3
4
5
6
7
8
9
10
11
12
13
14
15
16
17
18
19
20
21
22
| public static void main(String[] args) {
try {
CyclicBarrier cyclicBarrier = new CyclicBarrier(3);
for (int i = 0; i < 3; i++) {
int finalI = i;
Thread th = new Thread(() -> {
try {
System.out.println(String.format("执行第%s个线程", finalI));
cyclicBarrier.await();
System.out.println(String.format("第%s个线程执行完成", finalI));
} catch (InterruptedException e) {
e.printStackTrace();
} catch (BrokenBarrierException e) {
e.printStackTrace();
}
});
th.start();
}
} catch (Exception e) {
e.printStackTrace();
}
}
|
打印结果是:
1
2
3
4
5
6
| 执行第0个线程
执行第1个线程
执行第2个线程
第0个线程执行完成
第2个线程执行完成
第1个线程执行完成
|
Semaphore
Semaphore 称为信号量,是指定几个数量线程通过。

具体代码如下:
1
2
3
4
5
6
7
8
9
10
11
12
13
14
15
16
17
18
19
| public static void main(String[] args) {
Semaphore semaphore = new Semaphore(2);
for (int i = 0; i < 10; i++) {
try {
System.out.println(String.format("获得第%s个许可", i));
semaphore.acquire();
System.out.println(String.format("第%s个许可获得成功", i));
int finalI = i;
Thread th = new Thread(() -> {
System.out.println(String.format("执行第%s个线程", finalI));
semaphore.release();
System.out.println(String.format("第%s个线程执行完成", finalI));
});
th.start();
} catch (InterruptedException e) {
e.printStackTrace();
}
}
}
|
执行打印结果:
1
2
3
4
5
6
7
8
9
10
11
12
| 获得第0个许可
第0个许可获得成功
获得第1个许可
第1个许可获得成功
获得第2个许可
执行第0个线程
第0个线程执行完成
第2个许可获得成功
获得第3个许可
执行第1个线程
第1个线程执行完成
....
|
分析上面的结果,可以发现只有两个线程同时执行,等一个线程释放了,另一个线程才能执行完成。
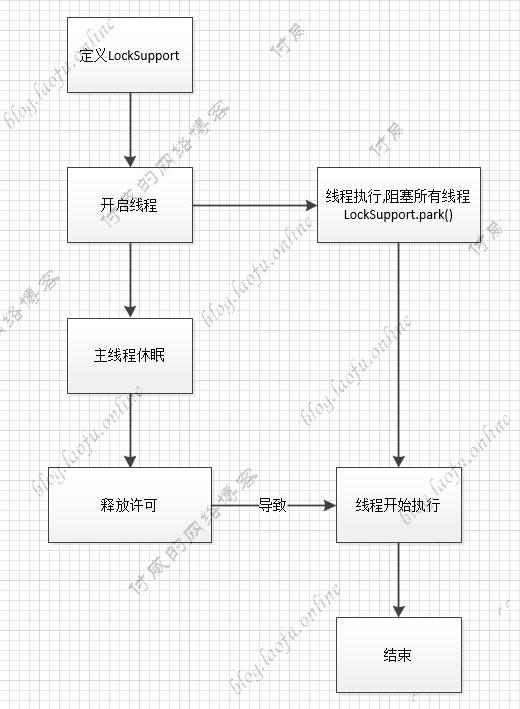
LockSupport
LockSupport与Semaphore类似,相当于只有一个许可的信号量Semaphore semaphore = new Semaphore(1),具体的实现逻辑:
1
2
3
4
5
6
7
8
9
10
11
12
13
14
15
16
17
18
19
20
| public static void main(String[] args) {
for (int i = 0; i < 10; i++) {
try {
int finalI = i;
Thread th = new Thread(() -> {
System.out.println(String.format("执行第%s个线程", finalI));
LockSupport.park();
System.out.println(String.format("第%s个线程执行完成", finalI));
});
th.start();
Thread.sleep(1000);
LockSupport.unpark(th);
Thread.sleep(1000);
System.out.println("主线程执行完成");
} catch (Exception e) {
e.printStackTrace();
}
}
}
|
打印结果:
1
2
3
4
5
6
7
8
| 执行第0个线程
第0个线程执行完成
主线程执行完成
执行第1个线程
第1个线程执行完成
主线程执行完成
执行第2个线程
第2个线程执行完成
|